Vue.jsで作るtodoアプリ
前回の記事はこちら
Vue.jsの始め方#4(html/css/js/jQueryがある程度わかる方向け)
これまで紹介したディレクティブを使って
簡単なtodoアプリを作ってみましょう。
下記が完成品です。
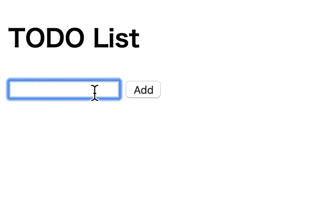
ページのリロードをせずにタスクの追加・完了・削除ができよう実装します。
※タスクの保存はしない仕様とします。
空のVueインスタンスとテンプレートの作成
まずはhtmlとjsシートに書きを準備しています。
※jsfiddleを使用してコード部分のみ記述します。
<divid="app"></div><script src ="https://cdn.jsdelivr.net/npm/vue@2.5.16/dist/vue.js"></script>varapp=newVue({el:'#app',})要素の配置とイベントハンドリング
<divid="app"><h2>TODO List</h2><formv-on:submit.prevent><inputtype="text"><buttonv-on:click="addItem">Add</button></form></div><script src ="https://cdn.jsdelivr.net/npm/vue@2.5.16/dist/vue.js
"></script>varapp=newVue({el:'#app',methods:{addItem:function(event){alert();}}})
デバッグのためにalertを記述して動作確認します。
alertダイアログが表示されます。
formのsubmitイベントでページのリロードを無効にするため
formタグにイベント修飾子preventを追記しておきましょう。
inputタグの中身を双方向データバインディングする
<divid="app"><h2>TODO List</h2><formv-on:submit.prevent><inputtype="text"v-model="newItem"><buttonv-on:click="addItem">Add</button></form><pre>{{ $data }}</pre></div><script src ="https://cdn.jsdelivr.net/npm/vue@2.5.16/dist/vue.js
"></script>varapp=newVue({el:'#app',data:{newItem:""},methods:{addItem:function(event){alert();}}})
v-modelディレクティブでinputタグの中身をバインディングします。
デバッグ用にpreタグを使用してdataオプションの中身を確認しましょう。
タスクの追加
次に空の配列を用意しAddボタンのクリックイベントで
タスクを配列に格納していきます。
<divid="app"><h2>TODO List</h2><formv-on:submit.prevent><inputtype="text"v-model="newItem"><buttonv-on:click="addItem">Add</button></form><pre>{{ $data }}</pre></div><script src ="https://cdn.jsdelivr.net/npm/vue@2.5.16/dist/vue.js
"></script>varapp=newVue({el:'#app',data:{newItem:"",todos:[]},methods:{addItem:function(event){//alert();if(this.newItem=='')return;//タスク未入力の場合は追加しないvartodo={item:this.newItem};this.todos.push(todo);this.newItem=''//タスク追加後に入力欄を空にする}}})
dataオプションに空の配列todosを作成し
addItemメソッド内でinputタグの中身を
todoとして取得してtodosの配列へ格納しています。
task入力後にinput欄をクリアしておきましょう。
合わせてタスク未入力の場合は追加ができないようif文を記述しましょう。
タスクのリスト表示
<divid="app"><h2>TODO List</h2><formv-on:submit.prevent><inputtype="text"v-model="newItem"><buttonv-on:click="addItem">Add</button></form><ul><liv-for="todo in todos">{{todo.item}}</li><!--配列の中身を1つずつ取得--></ul><pre>{{ $data }}</pre></div><script src ="https://cdn.jsdelivr.net/npm/vue@2.5.16/dist/vue.js
"></script>varapp=newVue({el:'#app',data:{newItem:"",todos:[]},methods:{addItem:function(event){//alert();if(this.newItem=='')return;vartodo={item:this.newItem};this.todos.push(todo);this.newItem=''}}})
v-forディレクティブをliタグに設定して配列の中身を取得します。
タスクの管理とスタイルの設定
<divid="app"><h2>TODO List</h2><formv-on:submit.prevent><inputtype="text"v-model="newItem"><buttonv-on:click="addItem">Add</button></form><ul><liv-for="todo in todos"><inputtype="checkbox"v-model="todo.isDone"><!--チェックボックス同期--><spanv-bind:class="{done: todo.isDone}">{{todo.item}}</span><!--classの追加--></li></ul><pre>{{ $data }}</pre></div><script src ="https://cdn.jsdelivr.net/npm/vue@2.5.16/dist/vue.js
"></script>varapp=newVue({el:'#app',data:{newItem:"",todos:[]},methods:{addItem:function(event){//alert();if(this.newItem=='')return;vartodo={item:this.newItem,isDone:false};this.todos.push(todo);this.newItem=''}}})#appul{list-style:none;}#appli>span.done{text-decoration:line-through;}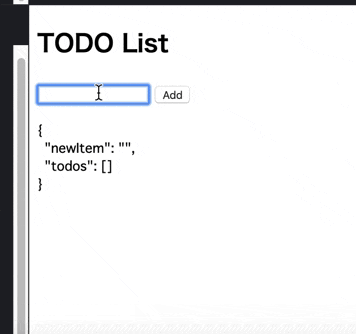
タスクにチェックボックスを設定しv-modelディレクティブで
ステータスをisDoneと同期します。
isDoneのステータスによってclassが付与されるよう
v-bindディレクティブでclassをバインディングしましょう。
classの付与によって打ち消し線が表示されるようCSSを記述しました。
タスクの削除
<divid="app"><h2>TODO List</h2><formv-on:submit.prevent><inputtype="text"v-model="newItem"><buttonv-on:click="addItem">Add</button></form><ul><liv-for="(todo,index) in todos"><!--indexを引数に追加--><inputtype="checkbox"v-model="todo.isDone"><spanv-bind:class="{done: todo.isDone}">{{todo.item}}</span><buttonv-on:click="deleteItem(index)">Delete</button> <!--indexを引数に指定--></li></ul><pre>{{ $data }}</pre></div><script src ="https://cdn.jsdelivr.net/npm/vue@2.5.16/dist/vue.js
"></script>varapp=newVue({el:'#app',data:{newItem:"",todos:[]},methods:{addItem:function(event){if(this.newItem=='')return;vartodo={item:this.newItem,isDone:false};this.todos.push(todo);this.newItem=''},deleteItem:function(index){//indexを引数に指定this.todos.splice(index,1)//indexで指定された要素を1つ削除}}})
以上でtodoアプリは完成となります。
タスクの追加、完了、削除の動作確認をして
問題なければデバッグ用のpreタグを消しておきましょう。
次回はテンプレート構文です。